Knife Sharpening 101: How to Keep Your Survival Knife Razor Sharp in the Field

There's a common saying in the survival and outdoor community: "A sharp knife is a safe knife." This might seem counterintuitive, but it's a fundamental truth. A dull knife requires you to use excessive force, which can lead to slips and dangerous accidents. A sharp knife, on the other hand, does the work for you, cutting predictably and efficiently. The basic principle of sharpening is simple: you are using an abrasive surface to remove a small amount of metal from each side of the blade, creating a new, fine edge. This knife sharpening guide will walk you through the basics of how to sharpen a knife, both at home and in the field.
Essential Sharpening Tools
While you can use improvised methods, having a few dedicated tools makes the job much easier and more precise.
-
Sharpening Stones (Whetstones): These are the gold standard for sharpening. They come in different "grits." A coarse grit (below 1000) is used to repair chips and establish a new edge on a very dull knife. A fine grit (1000-6000) is used to refine and polish that edge to razor sharpness.
-
Field Sharpeners: For field sharpening techniques, you need something portable. Pocket-sized sharpeners with diamond or ceramic rods are excellent for quick touch-ups on the trail. They are lightweight and effective.
-
Strops and Honing Compounds: A strop is a piece of leather used for the final stage of sharpening. When loaded with a fine abrasive compound, it polishes the very edge of the blade, removing the microscopic "burr" and taking its sharpness to the next level.
The Sharpening Process: A Step-by-Step Guide
The key to sharpening is consistency, especially with your angle.
-
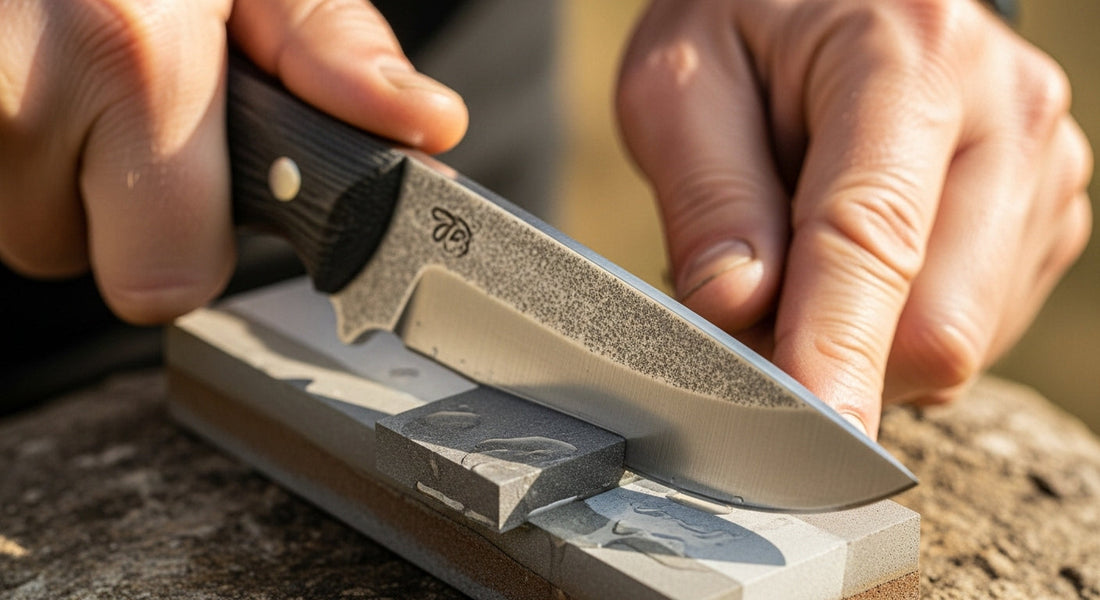
Find the Correct Angle (The "Sharpie Trick"): The most difficult part of sharpening is maintaining a consistent angle between the blade and the stone (usually 15-20 degrees for a survival knife). An easy way to find this is the "Sharpie trick." Color the very edge of your knife's bevel with a Sharpie marker. Lay the knife on the stone and adjust the angle until you can see that the stone is removing the ink from the very tip of the edge. That's your angle.
-
The Motion: Consistent Strokes: Holding your angle, push the knife along the stone from the heel (the back of the blade) to the tip, as if you were trying to slice off a thin layer of the stone. Do this 5-10 times.
-
Raise and Remove the Burr: Flip the knife over and repeat the same number of strokes on the other side. You are trying to raise a "burr"—a tiny wire edge of metal that you can feel on the opposite side of the blade you just sharpened. Once you can feel the burr along the entire length of the blade, it's time to switch to your fine grit stone (or the other side of your field sharpener) and use light, alternating strokes to remove the burr and refine the edge.
-
Strop (Optional): Finish by stropping the blade on a piece of leather to polish it to a razor's edge.
Field Expedient Sharpening
If you find yourself without your dedicated tools, you can use a few common items for a quick field sharpening.
-
Ceramic Mug: The unglazed ring on the bottom of most ceramic coffee mugs is an excellent abrasive surface, similar to a fine ceramic sharpening rod.
-
Car Window: The top edge of a car window is a surprisingly good surface for putting a quick, rough edge on a very dull knife.
Conclusion: Making Maintenance a Habit
Survival knife maintenance is a habit, not a one-time fix. After sharpening, always clean your blade thoroughly and apply a light coat of oil to prevent rust, especially if it's a high-carbon steel knife.